

Five Tips to Improve Your Panning Images
```html
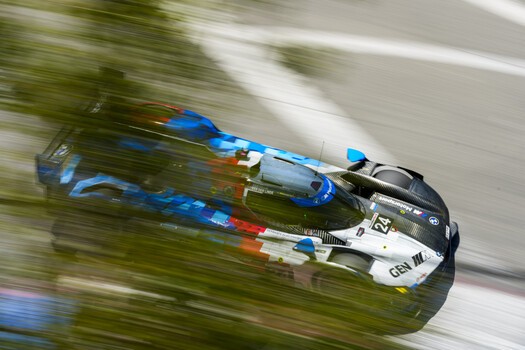
Panning is an integral part of sports and action photography, but mastering the technique can add interest and intrigue to many genres. I am going to break down the five things I consider when trying to create a good panning image.
Step 1: What Kind of Photo Do You Want?
A successful panning shot starts by thinking about what you want the shot to look like. How much motion blur do you want/need? Are you going for an artistic, slightly abstract feel, or do you want a very detailed subject with enough blur to convey motion to the viewer?
As a motorsport photographer, the first thing I think about is how the photo will be used. If a client needs the car tack sharp, with every sponsor decal legible and in focus, I'll start with a faster shutter speed, and once I know I have a usable shot, I'll work slower and slower. If the photo is for editorial work or just has to "look cool," I will start with a slower shutter speed and accept more blur on the car.
As your subject's speed increases, the level of difficulty tends to increase as well. Shooting a car in city traffic will require very different settings and considerations than shooting race cars, which is important to understand, or you can get frustrated with your results.
Step 2: Geometry and Orientation
The direction of travel and the shooter's proximity to the subject are important to consider. A car moving at high speed perpendicular to a photographer a short distance away will generally be more difficult to shoot than a car moving at similar speeds through an arcing corner far away. Understanding this will help you plan how to position yourself and make good decisions about your settings.
You want to position yourself in an area where your subject will move across your path in a predictable motion, at a consistent speed if possible, to achieve the best results. For street photography, choose a spot near an intersection where you can track a vehicle or people crossing a crosswalk. Set yourself up with as much distance as you can between you and your subject to avoid having to move the camera too quickly if you are new to panning.
Wide angle lenses can make things easier if you do not have much room to work with in a crowded city. For sports and motorsports, a longer lens is usually preferred due to environmental constraints and the level of detail you may need on the subject.
In addition to the direction of travel, you also need to consider the surface the subject is traveling over. There are several racetracks I cover that have very bumpy sections. If I'm trying to pan a race car over those bumps at a shutter speed of 1/20 or 1/10 of a second, the car's up-and-down motion will degrade the result. I can hold the car steady in the frame for the entire turn and still end up with an unusable photo because I couldn't account for its vertical motion.
Step 3: Camera Settings
Now that you've thought about how your photo could be used, how much blur you want, your subject's speed, and the direction of travel, it's time to use those factors to determine your settings and shoot. Whether your subject is a person walking or a race car, the goal of a panning shot is to convey motion to the viewer, so your shutter speed will vary based on the subject's speed and the desired level of blur.
For cars, on the street or the racetrack, you want to make sure the wheels show motion blur rather than being frozen, or the car will appear to be parked. When panning a subject moving at high speed, start with a shutter speed of 1/120 and then adjust slower or faster based on your results. For cars moving more slowly, like in city traffic, a good starting shutter speed is 1/40, then adjust as needed.
For people, creating the blur is a little more obvious, as other people and the background will blur more easily with small changes to your shutter speed. People walking will require slower shutter speeds, so start with 1/15 of a second and go from there.
If you are new to panning, a great technique is to start in Shutter Priority. You only need to set the desired shutter speed and let your camera figure out the rest. As you get used to panning in that mode, pay attention to the other settings the camera is choosing. As you find photos you like, note the aperture and ISO the camera chose for those images and use that to build your reference for when you take more control of the process.
While shutter speed is the primary setting that allows for that beautiful blurred background, it is not the only thing you will want to control as you get more comfortable with panning. Trying to pan a fast-moving subject with a wide-open aperture like f/2.8 or lower can be very tricky given the small plane of focus. Giving yourself a larger plane of focus with an aperture of f/8, f/10, or higher allows more of the frame to be in focus and increases the chances of a usable image.
Which brings us to how you focus: manual vs. autofocus. Depending on your gear and experience, autofocus can work just fine even with very fast-moving subjects. Sometimes it is easier to manually focus on the area your subject will travel through, then shoot the subject as it drives or walks through it. Manually focusing on the area makes the aperture discussion very important, as the smaller your plane of focus is, the more difficult it will be to nail the subject with your panning. Panning a car or person with manual focus and a large plane of focus is a great way to get started since you have a higher probability of your subject being in the plane of focus.
For a broader grounding in camera technique, Photography 101 may also be useful.
Step 4: Body Position and Camera Movement
A successful panning shot requires many things to happen correctly at the same time. One critical aspect is how you hold and move your camera. You want to make sure your body is as stable as possible. It will be very difficult to support and move your camera in a steady motion if you are struggling for balance. If that means taking a knee or supporting yourself alongside a building or fence, do it. If you are using a long, heavy lens, then a monopod is your friend.
Once you've created a stable platform with your body, you want to hold your camera comfortably to minimize unwanted movement and allow smooth movement in a single plane. A solid grip on the camera body and lens can vary from person to person. For smaller lenses, I tend to hold the lens base where it attaches to the camera with my left hand for support. When using a 70-200mm or longer lens, I tend to hold the lens hood with my left hand and the camera body in my right. Try different iterations to see what works best for you.
The movement of the camera itself is key, as you want to provide smooth, steady panning while tracking the subject within the same area of your viewfinder. When shooting with slower shutter speeds, any movement of your subject left or right in the frame will cause your photos to lack detail and focus, as will any up-and-down movement you induce as you move the camera.
Regardless of how you hold your camera and lens, you want to tuck your elbows as tightly to your body as possible to create a stable platform and reduce the tendency for the camera to move as you pan. It is easy to move the camera in an arcing motion when you first start panning. The goal is to move the camera along only one axis to minimize errors.
Step 5: Accessories
Let's talk filters. When shooting during the day with very slow shutter speeds, using a Neutral Density (ND) filter can be the difference between achieving a usable shot and not. There are conditions where you can set the aperture to f/18 or higher and still get a well-exposed photo, but you will likely need a filter.
A good ND filter lets you use a wider range of aperture settings and gives you control over your depth of field that you would otherwise lose when using very slow shutter speeds. I often carry a multi-stop filter and a fixed ND filter that also serves as a circular polarizer to reduce reflections on car windshields.
When learning any new technique or skill, experimentation is the name of the game. The considerations I've discussed here are meant to help you get started; they are not a solution to every situation. Even if you have no interest in motorsports or sports photography, I encourage you to try some panning in street and editorial photography.
Increasing the element of motion in photos where people don't expect it can bring vibrancy to your images. And trying something new can be a great way to reinvigorate your love for the medium.
```
What's Your Reaction?
 Like
0
Like
0
 Dislike
0
Dislike
0
 Love
0
Love
0
 Funny
0
Funny
0
 Wow
0
Wow
0
 Sad
0
Sad
0
 Angry
0
Angry
0









Comments (0)