


How to complete Liminality in Destiny 2: The Final Shape
Liminality is the Strike added to Destiny 2 with The Final Shape expansion, and it's a real banger. It's got everything that makes the expansion's campaign so much fun to play through and forms a key part of it towards the end, but it's fairly complex the first time around. You'll first play through Liminality as a narrative story mission when experiencing The Final Shape's campaign. It's definitely not the meatiest mission in the story, but it has a few mechanics that will force you to think on your feet and some extremely pressured encounters you won't have seen before. I believe this is the best strike we've ever had in the game, but it certainly takes some getting used to it when you're initially exploring it. How to complete Liminality in Destiny 2: The Final Shape Below, I've outlined exactly how to complete Liminality in Destiny 2: The Final Shape. Each step roughly covers a single encounter, so if you're stuck on a particular part, have a look for it below and uncover what you need to do. Step 1: Drain the Purulence Screenshot by Destructoid If you're like me, you'll follow the other two Guardians you matchmake with through this Strike, killing enemies, cleaning cave openings with vines in them, and jumping across platforms until you enter a cave filled with Purulence. This blocker The Witness put in place to stop you from progressing, and you've got to remove it. However, this is also a bit of a narrative step to help explain a mechanic you need later. Listen to what the Vanguard says over the radio, collect the energy from enemies, and use it on the Ahamkara Skull to kill the Wizard and drain the Purulence. The next section is just traversal and pushing forward, so follow the path down through where the Purulence was. It's super creepy and packed with hands and faces, just like the rest of The Pale Heart, and really is worth pausing to appreciate here and there. Step 2: Break Lucent Seals Screenshot by Destructoid The next encounter requires you to break three Lucent Seals. This isn't complicated at all. Kill enemies in here until a Seal-Keeper spawns, then kill that to break a Lucent Seal. Do this three times, and you'll be out of there, but be careful because the area gets packed with enemies so fast during this encounter. Move forward and admire that Witness architecture again. Take note of the scary hands and feel that sense of unease because the next encounter will push you beyond your limits. Step 3: Activate the Ahamkara Skulls with Taken Energy Screenshot by Destructoid As you enter the room, you'll see a massive Tormentor that's going to spawn in enemies to really make this tiny room feel so much smaller and more lethal. Your task is to find some Taken Energy and then use it to activate the Ahamkara Skulls in the room. To do this, kill a few enemies and wait for orange portals to spawn on either side of the room. You can jump through these to enter a new area where you'll see a ball of Taken Energy. The room on the left is a long corridor that you'll need to sprint out of as Purulence fills it when you try to escape. Run as fast as you can to get out. If you die, you'll need to attempt this one again. Screenshot by Destructoid The room on the right fills with Purulence from the ground up once you pick up the Taken Energy. You need to jump on the platforms that appear as you climb to escape with the Taken Energy. Whichever portal and room you successfully extract Taken Energy from, make sure you head directly to an Ahamkara Skull to activate it before you're killed. When I did this, our fireteam seemed to use the same portal and room for Taken Energy twice. However, it's definitely easier to have two of you peel off into your portals and speed up the process. The next encounter is way less stressful but a lot more harrowing. Step 4: Investigate the veiled statue and survive Screenshot by Destructoid Following a bit more exploration, you'll enter a massive city that your Ghost says we've never seen anything like before. I beg to differ because it looks a lot like the locations you visit in Season of the Deep. Regardless, here, your job is to investigate the veiled statue. When you interact with it, the city is going to go on the alert, and enemies will pour in. You've got to survive and interact with the statue between waves to get the full story from it. It's an easy encounter if you stand on the higher ground close to the statue and don't move off. The area will quickly get tighter, but you should be fine as long as you use a powerful weapon like The Call. Step 5: Defeat the Tormentor Screenshot by Destructoid Your next task is to defeat a Tormentor in the nastiest room I've ever seen in Destiny 2. The Witness definitely didn't think it would have guests here because there are Ahamkara guts everywhere, and you've got to get right up to them in this fight. Screenshot by Destructoid The Tormentor has three sections of health.
Liminality is the Strike added to Destiny 2 with The Final Shape expansion, and it's a real banger. It's got everything that makes the expansion's campaign so much fun to play through and forms a key part of it towards the end, but it's fairly complex the first time around.
You'll first play through Liminality as a narrative story mission when experiencing The Final Shape's campaign. It's definitely not the meatiest mission in the story, but it has a few mechanics that will force you to think on your feet and some extremely pressured encounters you won't have seen before. I believe this is the best strike we've ever had in the game, but it certainly takes some getting used to it when you're initially exploring it.
How to complete Liminality in Destiny 2: The Final Shape
Below, I've outlined exactly how to complete Liminality in Destiny 2: The Final Shape. Each step roughly covers a single encounter, so if you're stuck on a particular part, have a look for it below and uncover what you need to do.
Step 1: Drain the Purulence

If you're like me, you'll follow the other two Guardians you matchmake with through this Strike, killing enemies, cleaning cave openings with vines in them, and jumping across platforms until you enter a cave filled with Purulence. This blocker The Witness put in place to stop you from progressing, and you've got to remove it.
However, this is also a bit of a narrative step to help explain a mechanic you need later. Listen to what the Vanguard says over the radio, collect the energy from enemies, and use it on the Ahamkara Skull to kill the Wizard and drain the Purulence.
The next section is just traversal and pushing forward, so follow the path down through where the Purulence was. It's super creepy and packed with hands and faces, just like the rest of The Pale Heart, and really is worth pausing to appreciate here and there.
Step 2: Break Lucent Seals

The next encounter requires you to break three Lucent Seals. This isn't complicated at all. Kill enemies in here until a Seal-Keeper spawns, then kill that to break a Lucent Seal. Do this three times, and you'll be out of there, but be careful because the area gets packed with enemies so fast during this encounter.
Move forward and admire that Witness architecture again. Take note of the scary hands and feel that sense of unease because the next encounter will push you beyond your limits.
Step 3: Activate the Ahamkara Skulls with Taken Energy

As you enter the room, you'll see a massive Tormentor that's going to spawn in enemies to really make this tiny room feel so much smaller and more lethal. Your task is to find some Taken Energy and then use it to activate the Ahamkara Skulls in the room.
To do this, kill a few enemies and wait for orange portals to spawn on either side of the room. You can jump through these to enter a new area where you'll see a ball of Taken Energy. The room on the left is a long corridor that you'll need to sprint out of as Purulence fills it when you try to escape. Run as fast as you can to get out. If you die, you'll need to attempt this one again.

The room on the right fills with Purulence from the ground up once you pick up the Taken Energy. You need to jump on the platforms that appear as you climb to escape with the Taken Energy. Whichever portal and room you successfully extract Taken Energy from, make sure you head directly to an Ahamkara Skull to activate it before you're killed.
When I did this, our fireteam seemed to use the same portal and room for Taken Energy twice. However, it's definitely easier to have two of you peel off into your portals and speed up the process. The next encounter is way less stressful but a lot more harrowing.
Step 4: Investigate the veiled statue and survive

Following a bit more exploration, you'll enter a massive city that your Ghost says we've never seen anything like before. I beg to differ because it looks a lot like the locations you visit in Season of the Deep. Regardless, here, your job is to investigate the veiled statue.
When you interact with it, the city is going to go on the alert, and enemies will pour in. You've got to survive and interact with the statue between waves to get the full story from it. It's an easy encounter if you stand on the higher ground close to the statue and don't move off. The area will quickly get tighter, but you should be fine as long as you use a powerful weapon like The Call.
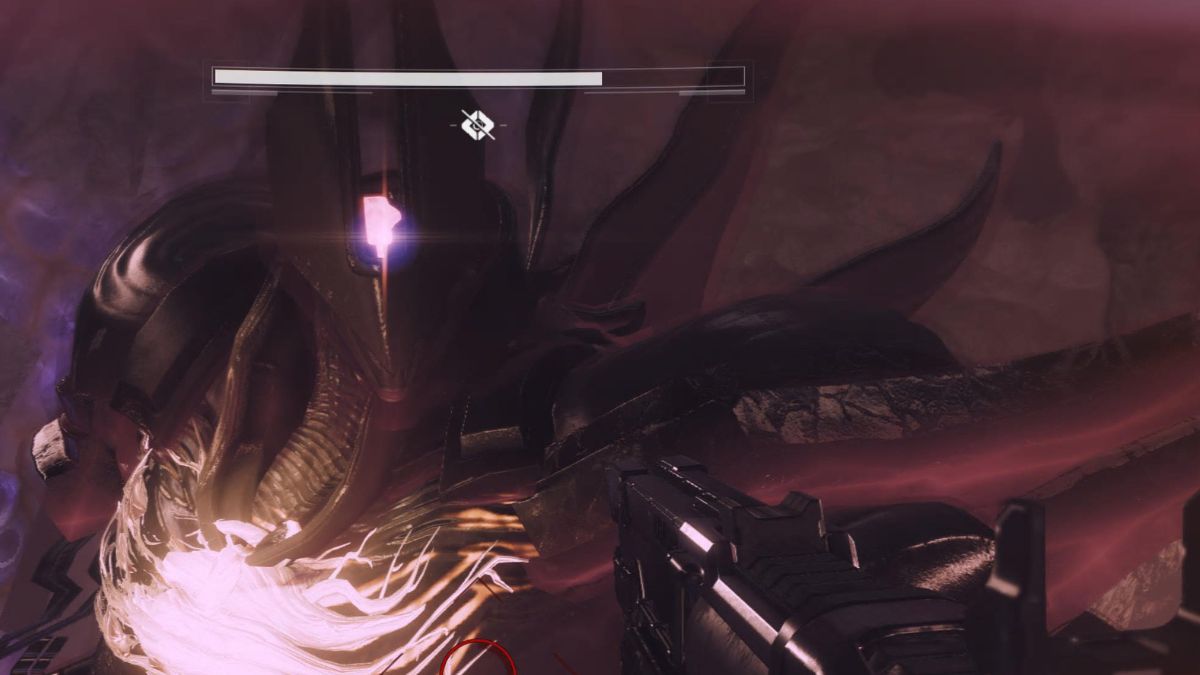
Step 5: Defeat the Tormentor

Your next task is to defeat a Tormentor in the nastiest room I've ever seen in Destiny 2. The Witness definitely didn't think it would have guests here because there are Ahamkara guts everywhere, and you've got to get right up to them in this fight.

The Tormentor has three sections of health. After the first one is gone, it'll get a shield up, and you need to activate the Ahamkara Skulls in the arena using Taken Energy. You must hop into the gaping, purple intestinal holes to get that Taken Energy. There's one on each side of the room, both leading to different rooms.
Each room you teleport to is a quick dash with Taken Energy to get back to the arena with the Tormentor. Once you're back, activate the Ahamkara Skulls and start killing the tormentor again. The last health chunk requires one more bit of Taken Energy you pick up from a special Subjugator that spawns in that's used on another Ahamkara Skull at the back of the room. Following that tremendous effort, you can finally end this Tormentor.
That's the end of the Strike. You'll pick up your loot after the Tormentor is down and can feel safe once more. Listen to what the Vanguard is saying again because there are some big, important pieces of the story that will inform what you do next in there.
The post How to complete Liminality in Destiny 2: The Final Shape appeared first on Destructoid.