

Behind the Shot: How Do You Even Go About Photographing Radio Telescopes Under the Milky Way?
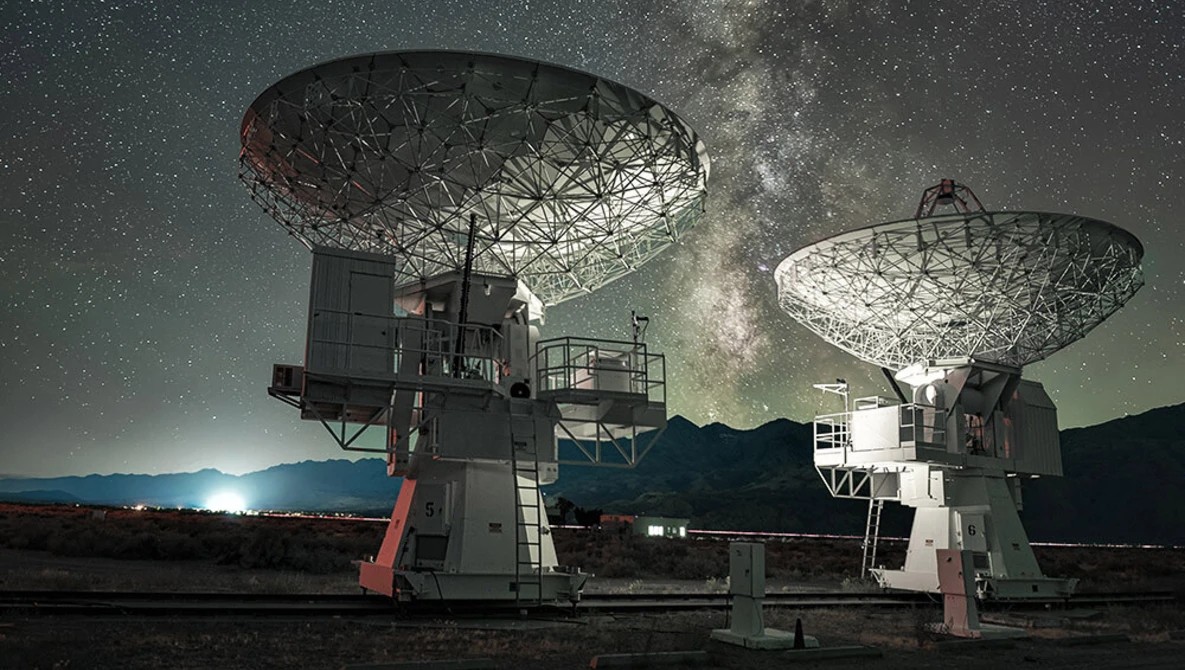
How do you photograph something like this? Two enormous radio telescopes, the Milky Way rising between them, and a foreground that actually has detail instead of disappearing into blackness. The answer involves a little planning, some tricks to reduce noise, a way to light the radio telescopes, and access to one of the most extraordinary locations in California. Here's how I did it.
About This Very Special Location!
The Owens Valley Radio Observatory (OVRO for short) rises from the stark Eastern Sierra desert like a collection of giant metal ears, quietly listening to the universe. Its radio telescopes listen across a huge range of radio wavelengths, studying everything from the Sun and exoplanets to galaxies, black holes, and the early universe. Against the backdrop of the Sierra Nevada, the observatory feels otherworldly.
Gaining Access to OVRO
I get asked frequently how I have been able to gain access to OVRO for almost a decade now. It came about in two different ways. There used to be a radio telescope array called CARMA, located up the scenic highway in the mountains several miles from OVRO. I stopped by there one day to visit, asking permission to photograph there at night. The two people there said I absolutely could and gave me the usual caveats (don't climb on the equipment, etc.). They explained that I didn't actually have to ask permission since it was near a camping area, but that it was still good for me to do so because they could let security know in advance. Not long after, CARMA was dismantled. Some of the radio telescopes were taken down the hill to OVRO.
Consequently, I still had contacts at CARMA. Not long after that, a night photographer gave me the contact of someone at Caltech. Caltech owns and administers the observatory, and the facility is operated through Caltech’s Astronomy Department. When on the premises, I was able to tell people that I had permission from that person. That was all I needed.
After photographing there several times throughout the years, I wanted to bring our Cosmic California Night Photography Workshop there, which would be a rare opportunity for our participants. I asked Caltech. They said yes, as long as no one climbed on them or used photos for commercial purposes without asking first. It was a go!
For anyone reading this, the easiest way is to contact someone at Caltech and ask for permission through their website. I cannot give my contact because I don't have his permission to do so, and also, he is retiring very soon. I can tell you that I have gotten access to many places, including here, because I asked, was respectful, and showed respect for and knowledge of the location. It also helps when I tell them that I have photographer's liability insurance. They really do like that.
Scouting the Location Before the Cosmic California Night Photography Workshop
I almost always scout locations prior to my workshops so that there are no surprises, and I can tell people about new features, things to watch out for, and other current information. I went to OVRO alone to photograph, and that is when I created this photograph.
I had ended a trip to Buenos Aires, flying back for over 12 hours on two planes. I was home for 12 hours. Then I drove five more hours to the Owens Valley, California, all with a bad cough. Not one of the brightest choices I made. I was tired. And I was coughing. But the magic of OVRO beneath the stars made it all better.
Lining Up the Milky Way
I was interested in photographing the Milky Way between two of the radio telescopes. Earlier, I had photographed Comet NEOWISE between two. Why not a Milky Way?
I walked around and found a place where the Milky Way lined up beautifully.
How Did I Shoot Photos to Stack for the Milky Way?
After framing my photo, I set my trusty 12-year-old Nikon D750 DSLR to 15 seconds at f/2.5, ISO 3,200. I then fired off 22 consecutive photos. Later, I would stack these to align the stars and reduce noise. More on that later.
The sky would look great. But what about the all-important foreground? I didn't want the radio telescopes to appear as dark silhouettes against the night sky!
Why Did I Photograph Another Photo for the Radio Telescopes?
I like really strong, often bold or interesting foregrounds. This is, after all, the subject. The sky is never the subject. It's more like the cherry on top.
I wanted to light the radio telescopes. But more than that, I wanted the light to come from the back and between them. This would make them appear as if the Milky Way were illuminating them. As a bonus, that would create all sorts of amazing detail and shadow. I needed time to do this sort of lighting from several different angles since I was doing handheld light painting.
Then, too, I wanted the foreground to be free of noise.
The answer? Shooting a low-ISO foreground photograph. This would give me time to do light painting from several different angles. And it would give me the clean, noise-free image that had more dynamic range than a high-ISO photo might have. Perfect.
How to Light the Radio Telescopes Evocatively
I set the camera for the corresponding amount of time to get more or less the same exposure, which was 2 minutes and 30 seconds at f/2.5, ISO 320. I had to do a lot of walking to light paint the radio telescopes, so the amount of time would help me out quite a bit.
I stood in the field. Making sure each radio telescope shielded me, I shined a warm white light from my LED flashlight onto the radio telescope that wasn't shielding me, waving the light up and down slowly to gently "paint" the light on.
In this way, I could also shine the light a little bit more at the dishes since they were farther away than the base, so the light painting could be nice and even. I also held my hand to stop some of the light "spill" from illuminating the ground too much. Having this amount of control over the light is one of the reasons I prefer handheld light painting to setting up stationary LED panels.
Of course, I did this for each radio telescope. I used the other radio telescope to shield me, then illuminated the other one.
Because I never moved the camera or the lens, I would be able to blend the low-ISO foreground photo and the stacked high-ISO Milky Way photo together later using Photoshop.
What Did I Use for Stacking?
I use a Mac Studio, so I use Starry Landscape Stacker (SLS). This app combines multiple exposures, aligning the stars while keeping the landscape stationary. Because random noise changes between frames while the Milky Way signal remains consistent, stacking averages out much of the noise and produces a significantly cleaner image.
If you have a PC, you can also do this using Sequator, also a very capable app.
And it's also easier to blend with a low-ISO foreground than a tracked shot. This is because a tracked shot blurs the foreground since the camera sensor is moving, making it trickier to blend photos during post-processing.
For a deeper look at astrophotography and post-processing techniques, Fstoppers' Photographing the World 2: Cityscape, Astrophotography, and Advanced Post-Processing covers these subjects in detail.
Reducing Noise However I Can!
I really don't like noise in my night photos. Although stacking 22 Milky Way images greatly reduces noise, I've been experimenting lately with gently reducing the noise of the images before stacking. I've been using Denoise in Lightroom at a setting of 25–29 to reduce the noise of the raw image, then exporting as TIFFs to stack in SLS.
I also applied a tiny bit of Denoise to my already low-ISO foreground photo before exporting. Again, I've been experimenting with this, but so far, I haven't seen any downside. It hasn't looked "fake" or "plastic" since I have been applying it gently.
Photoshop has been getting better and better about its sky selections. But since these radio telescopes have complicated support bars, I do still have to modify the layer mask by "painting" the stacked sky in. To do this, I often play Brian Eno, The Mercury Seven, Eleven Shadows, or Vidna Obmana's ambient music to get in the flow while post-processing.
Final Thoughts
This photograph was really a combination of planning, patience, and a little bit of walking around in the dark waving a flashlight at enormous radio telescopes. The Milky Way may be the obvious attraction, but getting the foreground right is what makes the photograph work for me.
The participants in our workshop loved the place and couldn't get enough of it. Consequently, we are thinking of adding OVRO to next year's workshop schedule. And this time, we just may add an extra night there! Some of our participants described photographing at OVRO as "inspiring." And that's certainly how I felt.
Equipment Used to Create This Photo
Nikon D750 DSLR (only available used now since it was originally released in 2014 and is rather long in the tooth!)
Acratech GP-s ball head (this is no longer available, but the GP-SS ball head is)
- Insignia Universal Wired Digital Interval Timer (Intervalometer)
What's Your Reaction?
 Like
0
Like
0
 Dislike
0
Dislike
0
 Love
0
Love
0
 Funny
0
Funny
0
 Wow
0
Wow
0
 Sad
0
Sad
0
 Angry
0
Angry
0










Comments (0)