

Shooting Anamorphic on The Nikon ZR With the Venus Optics Laowa Sunlight 2x Anamorphic Zoom
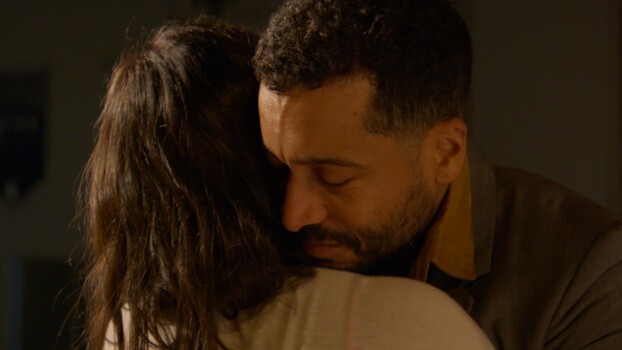
I’ve done separate review articles on both the Nikon ZR and the Laowa Sunlight 2x Full Frame Anamorphic Zooms in the past. Today, I thought it might be helpful to talk less specs and more process after using the combination on my latest film.
Sooner or later, every filmmaker gets around to anamorphic lenses. When I was first learning filmmaking in the celluloid days, we used anamorphics to maximize image quality across the width of the movie screen. Years and years of that industry practice, as well as audiences internalizing the unique language of anamorphic lenses, set a template for many as to what a big-screen spectacle really looks like. In the modern age, where we have 4K, 8K, or even 16K sensors all within the budget range of an owner-operator, relying on anamorphic for resolution purposes is less of an issue. These days, it's the particular benefits, some would say "oddities," that you get from shooting with anamorphic glass that intrigue cinematographers on an aesthetic level.
How We Made Our Gear Choice
There were three main reasons I ended up using the combination of the Nikon ZR and the Venus Optics Laowa Sunlight 2x Anamorphics for my film, Reunion. First, it was a bit counterintuitive. The film is essentially a two-hander that takes place in a single location. Anamorphic scale is largely shorthand for big action movies or lavish epics. In using anamorphic for a more intimate piece, we were giving the actors' faces the same level of scale and scope as a vast vista.
By "we," I mean myself and my DP, C. Clifford Jones. I am a writer/director but also shoot the majority of my own projects. For this one, though, I really wanted to collaborate with Cliff, a good friend of mine and an Emmy-nominated cinematographer, to see how far we could push the image. So he would DP the project and I would, as always, write and direct.
The second reason I specifically wanted to shoot with the Laowa Sunlight 2x Anamorphic Zooms was sheer production logistics. We were going to have an insanely tight schedule, one that would grow even tighter due to production hurdles worthy of their own separate article, and the ability to change focal length with a zoom rather than needing to take time out for lens swaps could have meant the difference between completing the project and not completing it.
Because the lens set I was able to procure was made for Z mount, that meant I was limited to using my Nikon cameras. Well, technically, I could have used one of the newer RED cameras, but because my Komodo is the OG with the RF mount, that wasn’t an option. So, in our case, it was going to be the lens choosing the camera and not the other way around. I own both the Z9 and ZR (and Zf). Cliff and I landed on shooting with the ZR largely for the R3D workflow.
Challenges
Before we discuss the results, let's get into some of the challenges presented by our chosen combination. As I say frequently, gear isn’t just about specs. It’s about workflow. Anamorphic has always presented a bit of a workflow challenge for filmmakers. If you’re not aware of how anamorphic works, essentially what the lens is doing is creating a "squeezed" image in camera to fit a wider image onto a narrower sensor. That image is then "desqueezed" in post, resulting in a wider aspect ratio while maximizing the use of your native sensor resolution.
To help explain, let’s do some math.
The Alexa Mini LF sensor resolution in open gate is 4,448 x 3,096, so the "squeezed" aspect ratio is about 1.44:1. With a 2x anamorphic desqueeze, you double the horizontal dimension: 4,448 × 2 = 8,896, over the same 3,096 vertical.
8,896 : 3,096 ≈ 2.87:1
So, shooting full open gate on the LF sensor with a true 2x anamorphic and desqueezing fully gives you a desqueezed aspect ratio of roughly 2.87:1. Unless you are delivering a 70mm Ultra Panavision master (2.76:1), you are likely still going to need to cut off quite a bit of your captured width to crop down into the standard 2.39:1 scope that we usually think of as widescreen.
If the above math made your head hurt, you and I have something in common. But that basic adjustment is very common in filmmaking, and cropping the sides is factored in when shooting. Before I go on to say why this was a particular challenge in our setup, let's do one more equation to calculate the desqueeze factor on the ZR.
The Nikon ZR, which has no open gate mode (at least not as of this writing), shoots, like most mirrorless cameras, in a 16:9 format. In decimal form, 16:9 is a roughly 1.78:1 aspect ratio. Doing our equation again:
16:9 × 2 (horizontal) = 32:9 ≈ 3.56:1
You can see the problem. If I’m still looking to land at a 2.39:1 final aspect ratio, this means that I’ll be throwing away massive real estate on the width of my frame. I could address this by shooting with a different set of anamorphic lenses. For instance, a 1.3x or 1.5x set would require me to throw away less on the outside of the frame for the final crop. But keep in mind that those unique anamorphic characteristics that make the look of the lens so great are variable based on the squeeze factor. So, the more the squeeze, the more of the anamorphic goodness that you get.
Seeing as our lens and camera choices had already been made, our crop factor was already baked into the plan. But this is where the Nikon ZR presented us with a big challenge. Unlike most cinema cameras, the Nikon ZR doesn’t allow for anamorphic desqueeze in the camera. Something like the Alexa or Komodo allows you to change your camera settings so that the image you’re seeing on the camera’s built-in displays will show you an image that is already desqueezed, so you can accurately judge framing and do relevant vibe checks. Because the ZR doesn’t have internal desqueeze, that big, beautiful 4-inch LCD will only show you the distorted, squeezed version, where everything and everybody on screen seems extra tall and extra slim.
You’re welcome to shoot like that if you’re not super particular about your final framing, but if you really want a true sense of what you're getting, you need to find a way to more accurately monitor a desqueezed image. Practically speaking, this isn’t difficult. It simply means adding an external monitor or EVF with the ability to desqueeze. Although, it is worth noting that, over the nearly a year now that I’ve had the ZR, this tends to be the point at which the workflow starts to get annoying.
I’ve already done an in-depth review of the camera, so I won’t rehash that here. All I will say is that when it comes to the ZR, the less you rig it, the happier you will be. I bought the ZR because it packs a lot of capability into a small form factor, and it delivers on that promise. But this was clearly a camera made for a content creator/one-man-band workflow and not a tool designed for a traditional team-based cinema workflow.
Let’s start with that small size. It is amazing when operating solo to be able to shed the weight. But the minute you put even a 5-inch external monitor atop the ZR, you’re now doubling the size of your rig and causing an awkward balance. If you want both a monitor and an EVF, now you’re really pushing your luck. Aside from the micro HDMI port question, the camera only has one video output, meaning that you either need a monitor with passthrough capabilities or need to add an HDMI splitter so you can send multiple signals. We haven’t even gotten yet to the very basic need of being able to send a wireless transmission out to a first AC so they can pull focus. That requires yet another HDMI signal. And, lest we forget, all of these things—monitor, EVF, transmitter, HDMI splitters, etc.—need to be powered. There’s simply not enough physical surface space on the ZR to make all that happen, so you end up building it out into a massive Frankenrig system that, by the time you’re all said and done, is just as big as a larger native cinema camera build. Yet, because of all the adapters connecting to adapters and mounting power sources and rails, it ends up feeling significantly less sturdy than if you had just begun the process with a larger, more sturdy body with more native monitoring capabilities already present.
Of course, this all compounds based on the ZR’s original sin, which I noted all the way back in my initial first impressions video. The memory card and battery door is on the bottom. Again, not a problem at all if you are working solo with zero rigging. But once you start putting all of those required components I just mentioned onto the camera, suddenly realizing that you can no longer access the memory card without taking the entire rig apart (or at least the bottom half) is a real-world problem, not just a hypothetical review gripe.
As for the lenses themselves, they also presented some base precautions to be considered. Anamorphic lenses historically have been, shall we say, huge. An anamorphic zoom lens, you can probably guess, is no exception. Even with a larger body like my Z9, but especially with the pint-sized ZR, having a lens that large on a camera body so small puts pressure on your lens mount. To keep from potentially damaging the mount itself, I was sure to outfit the rig with lens support, which then mandated the rig sit on 15mm rails (again, the ZR’s bottom-feeding card slot was an issue here). Not a major inconvenience. A production camera is likely to be on rails anyway to accommodate the first AC’s follow focus system. But in this case, those rails were pulling double duty.
Upsides
Now, one may think that the challenges I mentioned above are all reasons why you wouldn’t want to use this combination for a project. And there were times I was happy not to have to operate camera on this one, as my expert camera op, Jared Wilson, and longtime first AC, Mitch Sacco, did appear at times to be just seconds away from throwing the ZR out of the window. But this does point to another unavoidable fact from my year with the Nikon ZR.
I’ve used it now on countless projects, both big and small. I’ve used it in stripped-down situations and I’ve used it in oversized, jerry-rigged situations. At times I’ve loved it. At times I’ve absolutely hated it and considered throwing it out the window myself. But, as a matter of pure objective fact, it’s always gotten the job done. There’s never been a project where I got the ZR footage back to the computer and was anything other than impressed. On a recent, more one-man-band-style production, where I was shooting multicam with a combination of different camera builds, I absolutely found myself instinctively reaching for the ZR for extended takes, especially as we rounded hour 10 and handholding anything heavier than a matchbox required all my personal willpower.
So, I was incredibly happy with the look of Reunion. Much of that credit goes to the lighting of my excellent cinematographer, C. Clifford Jones. But because he laid such a strong foundation, it ended up being a really strong incubator to access the merits the ZR and the Laowa Sunlight 2x Anamorphic Zooms brought to the project. For anyone looking to sharpen the fundamentals behind that kind of collaboration, Introduction to Video: A Photographer’s Guide to Filmmaking is a solid place to start.
I got to see exactly the scenarios where that anamorphic "character" paid off, as well as a few scenarios where it did not. Of particular interest to me was that we did not use any sort of filtration in front of the glass, despite its 95mm front diameter being a perfect fit for my clamp-on matte box. Usually, I live with some sort of diffusion on my lens when shooting on mirrorless-sized bodies like the ZR. In this case, the lens was shot perfectly clean, yet still did an admirable job of knocking off some of that "video edge" you get with other lenses that force me to spend hours in post trying to address it.
Conclusions
The Nikon ZR and Laowa Sunlight 2x Anamorphics did an excellent job of helping to bring my project to life. As with every project, I learned a lot (as it should be). Certain rigging limitations of the ZR were confirmed for me, while the image quality was once again justified. The anamorphic characteristics and image quality of the Sunlights proved worth the extra measures required to support the lenses’ weight and the additional monitoring challenges in connection with the ZR.
I’d absolutely use this combination again despite the challenges. Or maybe, just maybe, Nikon can pretty please with a cherry on top add open gate and in-camera anamorphic desqueeze monitoring in the next firmware version? Well, a man can dream.
What's Your Reaction?
 Like
0
Like
0
 Dislike
0
Dislike
0
 Love
0
Love
0
 Funny
0
Funny
0
 Wow
0
Wow
0
 Sad
0
Sad
0
 Angry
0
Angry
0








Comments (0)