

The Lightroom Slider That Kills the White Halo on Mountain Edges
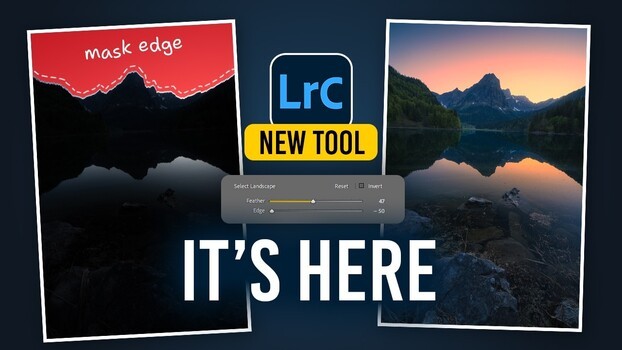
Adobe's August update for Lightroom Classic added a pair of sliders that quietly change how you build masks. Feather and edge controls now sit inside every AI mask, and they let you push a selection in or out until the edge sits exactly where you want.
In a full landscape edit walkthrough, Christian Möhrle takes a raw mountain-and-water scene and shows where these new sliders solve a problem you have probably fought for years. The classic headache is the thin white halo that appears along a ridge line when you mask the sky against dark mountains. Möhrle builds a sky mask using the landscape mask with the mountains option selected, then uses the edge slider to shift the boundary inward until that white line disappears. He warns against overlapping too far, since pushing the edge past the ridge produces a black outline instead. The feather slider then softens the transition so nothing looks cut out.
The rest of the edit is a steady sequence of corrections you can copy on your own files. Möhrle starts with the Adobe Standard profile to lower base contrast, lifts exposure to recover shadow detail, then tames the blown highlights in the sky. He cools the white balance early, knowing he will pour warmth back in later through split toning and the tone curves. Local work carries most of the mood here, and he leans on intersecting masks constantly. To warm a single patch of sky, he intersects the sky mask with a radial gradient, then drags the red channel highlight point left and the blue channel highlight point down for a strong yellow glow.
One trick stands out for anyone shooting reflections. To match the color in the water to the sky he just graded, Möhrle flips the image vertically, generates a sky mask on the upside-down frame to catch the reflection, then flips it back and intersects with a radial gradient. It is a clever workaround for a selection tool that reads the sky but not its mirror image. He cleans up a rock that got caught in the mask by subtracting an object mask drawn as a rectangle, then lets the glow spill into the water with another gradient. The edge and feather sliders reappear when he adds a glow behind the ridge, raising the feather high so the light fades naturally over the mountains instead of stopping at a hard line.
These new sliders arrive as the whole industry pushes selective, subject-aware editing deeper into the workflow. Photoshop's masking has moved the same direction, and phone cameras now apply local adjustments automatically before you ever see the file. What Möhrle demonstrates is the manual version of that idea, where you decide exactly how far a selection reaches rather than trusting the software's first guess. The principle worth taking away is that a mask edge is adjustable after the fact, so you no longer have to redraw a selection when it clips a hairline of the wrong tone. That frees you to build aggressive, layered masks, correct them at the boundary, and stack intersections without fear of a visible seam.
The color grading section follows the same deliberate approach. Möhrle drops the yellow hue, boosts orange and yellow saturation, and pulls blue down to balance the frame. He then applies heavy split toning, a warm hue around 30 in the highlights with saturation near 70, and a cold tone in the midtones for contrast. A final pass through the calibration tab lifts the blue primary saturation, and the detail panel handles sharpening with a masked slider so the effect stays off the smooth areas of the sky.
Watch the video above and follow along slider by slider to see the full sequence in motion.
What's Your Reaction?
 Like
0
Like
0
 Dislike
0
Dislike
0
 Love
0
Love
0
 Funny
0
Funny
0
 Wow
0
Wow
0
 Sad
0
Sad
0
 Angry
0
Angry
0






Comments (0)