

Crepuscular Rays: Why These Beautiful Beams Happen and How to Be Standing There
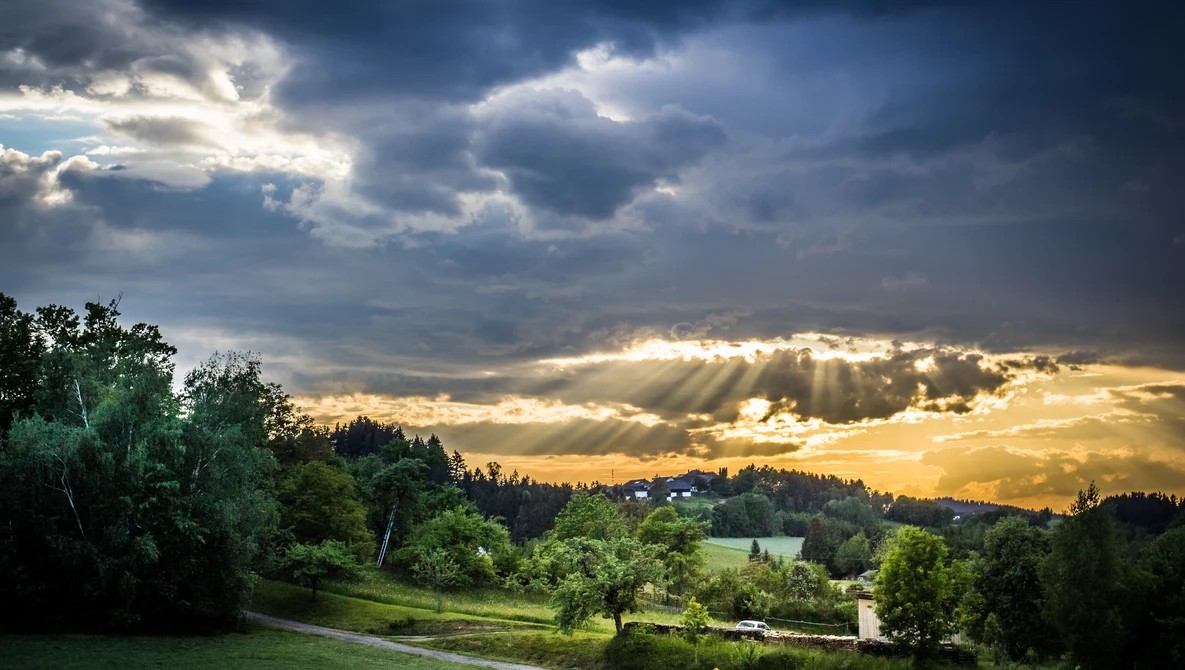
The shafts of light you call god beams are lying to you about their shape. They look like a fan bursting out of a hole in the clouds, splaying wider as they fall toward the ground, but the beams are very nearly parallel. You are watching the same trick that makes railroad tracks pinch together at the horizon, just pointed at the sky.
As a professional meteorologist, I get asked about these more than almost any other thing people see in the sky, usually with the word "rare" attached. They are not rare. Crepuscular rays are ordinary sunlight made visible, and once you understand the handful of conditions that light them up, you stop stumbling onto them by accident and start recognizing, an hour ahead, when the odds are worth driving for.
The Beams Are Parallel. You Are Seeing Perspective.
Start with the geometry, because it is the part almost everyone gets backward. The Sun sits roughly 93 million miles from Earth. At that distance, its rays reach us as an essentially parallel sheet of light. The Sun's disk is only about half a degree wide in our sky, which is not enough spread to make beams fan out across a landscape in front of you.
So why do they fan? Perspective. The beams are running roughly parallel to each other and, in many cases, roughly toward you. When parallel lines recede away from your eye, they appear to converge at a distant vanishing point, and when they rush toward you they appear to spread apart from a near one. The bright shafts streaming out of a cloud are doing the second thing. Atmospheric optics researchers make the comparison to the furrows of a plowed field or a straight road that looks wide at your feet and narrow in the distance. The rays only look like a searchlight fan because you are standing near the wide end of the tunnel.
Why the Light Becomes Visible
A beam of sunlight in a vacuum is invisible from the side. You do not see the light itself; you see light that has bounced off something and traveled to your eye. That is the whole reason crepuscular rays exist as a picture rather than a physics footnote.
When the Sun drops behind a cloud with a hard edge, or behind a ridgeline, the cloud casts long shadow corridors through the air. In the lit corridors between those shadows, sunlight strikes airborne particles and scatters toward you. NASA's Earth Observatory points to dust and tiny water droplets as what makes the sunbeams visible, and the usual cast of scatterers also includes sea salt, organic aerosols, and the air molecules themselves. Small molecules produce Rayleigh scattering, the same process that makes the daytime sky blue. Larger particles like dust and haze droplets produce Mie scattering, which is less color-selective and tends to throw light forward. The bright bands are lit air. The dark bands between them are the cloud's shadow, air that is not receiving direct sun. What you are photographing is not the beam so much as the contrast between a corridor of illuminated haze and the shadowed air beside it.
This is why the same sky can produce knockout rays one evening and nothing the next with identical clouds. Contrast is the currency here, and haze both earns it and spends it. A little scattering makes the lit corridors legible. A lot of it scatters light into the shadows as well, and the difference between corridor and shadow, which is the whole picture, starts to fill in.
The Three Things That Have to Line Up
Two of these are physics and cannot be negotiated: something has to block part of the light, and something has to scatter the lit part toward your eye. The air itself handles the second on its own. The third, extra haze, is the one people treat as the secret ingredient, and it is the one that most often works against them.
First, a low sun. Rays can appear at any time of day, as NASA points out, but they are most often visible near sunrise and sunset, and you want the Sun close to the horizon for two reasons. Low light rakes sideways across the landscape so the beams travel through your field of view instead of straight down past you. A low Sun also lengthens your line of sight through the shadow corridors themselves, and that is what builds the contrast. The Oklahoma study found rays most intense near the horizon because those geometries give "the greatest pathlength through the umbras," the densest part of the cloud shadows. The long path through air does one more thing, which is to warm the beams to gold, orange, and red: it strips out the short blue wavelengths and leaves the warm ones, the same Rayleigh scattering that reddens the whole sunset.
Second, a hard edge to block part of the light. You need something to carve the sunlight into shafts. A broken cumulus field with gaps between the clouds is the classic setup, but a single towering cloud with a crisp edge, a distant thunderstorm anvil, a mountain ridge, or even a line of buildings all work. Flat, featureless overcast will not do it, because there is no edge to cast the shadow corridors. You want structure: gaps, a torn cloud base, a defined top with sky behind it.
Third, something in the air to catch the light. Air molecules alone will do it, which is why the effect never disappears entirely in clean air, and dust, smoke, sea spray, pollen, and the fine droplets a humid air mass leaves hanging all add to it. This is the ingredient people get backwards. More is not better. A study of hundreds of Oklahoma observations, published in Monthly Weather Review, found rays "most frequent and intense when atmospheric visibility is relatively high because contrast is reduced when aerosol optical thickness is high," and it quotes Lynch reaching the same conclusion decades earlier: the rays "are most common when the air is clear." A modest amount of aerosol can help in the right geometry. Thick summer murk, heavy industrial haze, or dense wildfire smoke will wash the corridors out rather than light them up, because they brighten the shadows along with the beams.
Put those together and you have a watchlist rather than a forecast. Broken clouds moving in near sunset, air that is clean rather than soupy, and a clear horizon in the direction of the Sun. Be honest about the odds: the Oklahoma team's best prediction equation for crepuscular ray intensity explained about 28 percent of the variance, and they describe the predictability of these displays as low. What those conditions buy you is a better-than-usual evening, not a guarantee. When I see that combination on an afternoon, I plan to be outside.
Anticrepuscular Rays: Turn Around
Here is the move that separates people who understand these from people who just point at the pretty ones. When crepuscular rays are strong, turn 180 degrees and look at the sky opposite the Sun. Sometimes the same beams reappear over there, sweeping up from the far horizon and seeming to converge toward a single point. Those are anticrepuscular rays.
They are not different beams. They are the same parallel shafts of sunlight, continuing across the whole dome of the sky over your head and appearing to gather again at the far end, exactly the way a straight road converges both ahead of you and behind you. The point they aim for is the antisolar point, the spot directly opposite the Sun. You can find it without any instrument: it sits at the shadow of your own head. On a sunny day, look at where your head's shadow falls, and the antisolar point is right there. The Astronomy Picture of the Day has run several frames of anticrepuscular rays sweeping toward that point, and they are genuinely stranger and less photographed than the front-lit kind.
They tend to be fainter than the rays near the Sun, because there is simply less light being scattered back toward you from that side of the sky. But they show up most readily around sunrise and sunset, and if you have a clear view east while the Sun sets in the west, you are in position. Most people never see them for the simple reason that they never turn around.
How to Shoot Them
The exposure is the part cameras fight you on. Your meter sees a frame that is part brilliant beam and part dark cloud and splits the difference, which blows out the rays and mushes the contrast that made them worth shooting. Expose for the highlights instead. Pull your exposure down until the brightest part of the beams holds detail and stops clipping, and let the shadowed sky and foreground go darker than the meter wants. That protected contrast is the picture. It is easy to recover a little shadow later; a blown-out beam is gone.
Shoot into the light, but keep the Sun itself just out of frame or tucked behind the cloud edge. Let a cloud or a ridge block the disk so you get the shafts without a giant flare swallowing everything. Backlight is the point. A clean front element and a good hood matter more than usual here, because you are aiming into the brightest thing in the sky and every fingerprint and dust speck on the glass turns into veiling flare that kills the contrast you came for.
Focal length and where you stand change the whole character of the shot. Get in close with a wide lens and you sit at the mouth of the fan, exaggerating the spread and giving you that dramatic searchlight burst over a landscape. Back off and reach in with a telephoto and you get the opposite: shooting from farther away compresses the scene, isolating a few beams and letting you frame them against a ridgeline or a lone cloud. The compression comes from the distance you shoot from, not the glass itself; the long lens just lets you fill the frame from back there. If you want to pull distant beams tight and clean, a fast telephoto like the Sony FE 70-200mm f/2.8 GM II is ideal for reaching them, and it lets you pick off anticrepuscular rays across the valley without a hazy foreground getting in the way.
Because the sky is so much brighter than the land, the brightness gap is often wider than a single frame can hold. A graduated neutral density filter darkens the top of the frame so you can hold both the beams and a foreground in one exposure, which is worth it when there is a landscape you want to keep instead of a silhouette. If you would rather blend later, bracket a few exposures and merge them.
None of this is difficult, and it rewards planning more than gear. If you want to go deeper on reading light across a whole scene and processing high-contrast skies, Elia Locardi's landscape photography and post-processing course covers the workflow end to end, and the follow-up on advanced landscapes gets into the harder light. The beams themselves are free and more common than people think.
The next time the air is clean, the horizon is open, and a ragged line of clouds slides in toward sunset, do not wait to see whether the sky does something. Get to your spot, put the Sun behind a cloud edge, pull your highlights down, and take the shot. Then turn around.
Lead image by Sebastian Pichler, CC0. Source.
What's Your Reaction?
 Like
0
 Dislike
0
 Love
0
 Funny
0
 Wow
0
 Sad
0
 Angry
0











Comments (0)