How to Make Your Subject Pop Using Lightroom and Photoshop
Getting a sharp subject is one thing. Getting that subject to visually separate from the background and command attention is something else entirely. These editing techniques can make the difference between an image that looks decent and one that stops people mid-scroll.
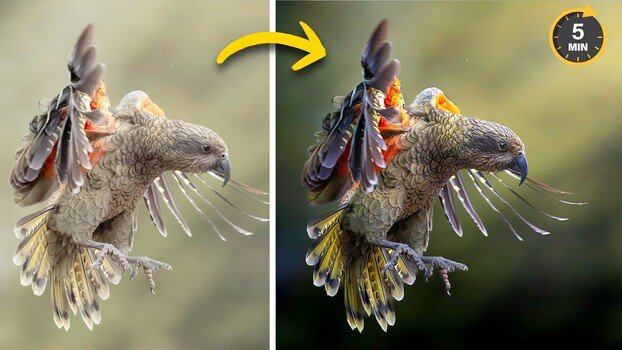
Coming to you from Matt Shannon, this practical video walks through a workflow for making subjects stand out using a combination of Lightroom and Photoshop, built around two photos of a kea, a rare alpine parrot native to New Zealand. Shannon starts in Lightroom with linear gradients and adjustment layers to darken the background around the subject. The key move here is using Lightroom's subject subtraction feature, which removes the subject from the gradient so only the background gets darkened. From there, Shannon brushes shadow back in manually around the edges to avoid a halo effect and keep the transition looking natural.
The technique goes further than just darkening the background. Shannon also creates a light source on the opposite side of the frame, using a radial gradient to add warmth and lift where the light is hitting the scene. He drops dehaze to soften the effect, creating a subtle atmospheric haze rather than a harsh spotlight. The contrast between the cooler tones in the shadows and the warmer light in the highlights gives the image real depth. He also zooms into the eye and brightens it directly with a brush, a small detail that has an outsized impact on where a viewer's attention goes first.
The Photoshop section takes things a step further with a technique Lightroom simply can't replicate: a synthetic lens flare built from a solid color layer and Photoshop's Lens Flare filter under the Render menu. Shannon places the flare in the corner where the natural light is coming from, then switches the layer blending mode to Screen so the black background disappears and only the light effect remains. He uses the Remove tool to clean up the secondary flare artifacts that come with the filter, keeping just the soft glow of the light source itself. A Color Balance adjustment warms the highlights and cools the shadows on the flare layer, and a layer mask painted over the subject keeps the effect from washing out the detail in the kea's feathers.
What makes this workflow worth paying attention to is that none of it relies on heavy-handed sliders or dramatic edits. The changes are subtle and stacked, and each one reinforces the others. The result is an image where the subject feels three-dimensional and lit, not just cropped and sharpened. Check out the video above for the full step-by-step breakdown from Shannon, including how he handles the flying kea shot entirely inside Lightroom.
What's Your Reaction?
 Like
0
Like
0
 Dislike
0
Dislike
0
 Love
0
Love
0
 Funny
0
Funny
0
 Wow
0
Wow
0
 Sad
0
Sad
0
 Angry
0
Angry
0


Comments (0)