

How to Photograph the 2026 Total Solar Eclipse
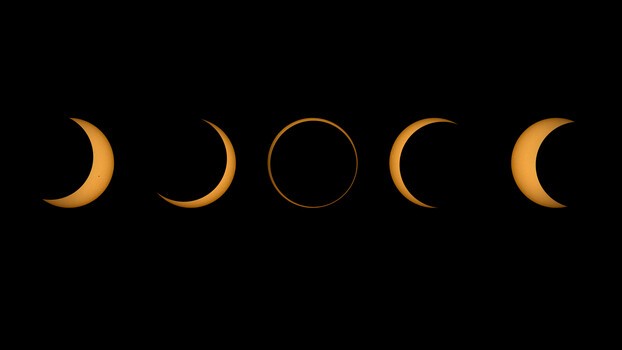
For up to two minutes and eighteen seconds on August 12, the sky along a narrow path running from the Arctic to northern Spain will go dark in the middle of the day. Birds may fall silent, the temperature will drop, and the sun's white corona will appear around the moon. It is the first total solar eclipse mainland Europe has seen since 1999, and if you have never stood in the path of totality before, nothing quite prepares you for how strange and beautiful this will be. For photographers, it is one of the most exciting subjects you will ever point a lens at, as it will be over in seconds and unforgiving of a missed setting.
The skies will darken as the moon passes directly between Earth and the sun. Although I do not live in the path of totality, living in western Scotland, I will see a deep partial eclipse. Being in Scotland, I am used to cloudy skies, but I am hopeful that I will be able to capture a good view of the eclipse with some strategic planning, regular checks of the local forecast, and a willingness to travel within a short radius to wherever the skies are clearest.
Where to Get the Best View
The path of totality runs through northern Russia, eastern Greenland, western Iceland, the North Atlantic, northern Spain, a small corner of Portugal, and the Balearic Islands. Iceland gets totality in the early evening, while Spain sees it low in the sky shortly before sunset, which suits coastal or elevated viewpoints. Outside that narrow band, including Madrid and Barcelona, even a very deep partial eclipse will miss the full experience, so it is worth traveling farther into the path if you can.
No part of North America sees totality this time, but parts of the northern U.S. and most of Canada will see a partial eclipse. The amount of the sun obscured will depend on your precise location, so check a location-specific eclipse map or calculator before planning your shoot.
How to Shoot an Eclipse
Safety comes first, and you need to ensure that you protect your eyes and your equipment from the sun's harmful rays. As most will already know, it is dangerous to look directly at the sun, and this remains true during every partial phase of an eclipse. Purchasing some solar eclipse glasses will allow you to look at the partially eclipsed sun safely. These can be picked up cheaply, but make sure they meet the ISO 12312-2 international safety standard and are not damaged or scratched. Similarly, you should never point your camera at the sun during the partial phases unless you have a proper solar filter securely fitted over the front of the lens.
My Gear Pick for Shooting the Eclipse
If I am recommending one piece of kit for this eclipse, it is the DWARFLAB DWARF mini Smart Telescope. Having used one over the last few months to capture everything from a time-lapse of clouds to searches for planets and constellations, I am confident that this will help me capture the eclipse while allowing me to enjoy the event and soak in the environmental changes as my surroundings darken.
It comes with a magnetic solar filter that attaches to the front of the optics, so there is no fiddling with filter threads as the eclipse approaches. Once you have attached the filter, selected the sun in the app, and centered it in the telephoto view, the telescope can autofocus and track the target. That takes several potential failure points out of your hands. For an event where you get a single, unrepeatable opportunity, a device that locks on and keeps working without constant manual correction is far more capable than its size suggests.
As with most forms of success, trial and error is a great teacher, and it is important to learn about the equipment you are using and improve your knowledge of it before any important use. I have been experimenting with the DWARF mini for a while now, and its time-lapse mode is one of the features I keep coming back to. With its dual-camera system and its handling of planets and deep space, it has handled sunsets and cloud movement across the sky pretty well, holding a locked composition while the light and cloud shapes shift over several minutes or hours, which is exactly the kind of steady, hands-off tracking you want for an eclipse sequence too.
I have used the time-lapse feature in both manual and automatic modes and find that the exposure jumps too much on auto, so sticking with manual is definitely the better option. Remember, auto does not know what you are trying to achieve; it operates according to what it assesses to be the right settings without that important human contextual knowledge.
While it is built with the sky in mind, do not assume that is all the DWARF mini Smart Telescope is good for. Switch between wide and telephoto, and it is just as capable when pointed at landscapes, birds, and general wildlife. That versatility is part of why I am packing it for the eclipse, so I can still shoot something of value as a sort of consolation prize, even if the clouds roll over.
To photograph the sun with the DWARF mini, place the telescope on a stable, level surface and attach the magnetic solar filter before pointing the optics toward the sun. Connect through the app, enter Solar System mode, select the sun, center it in the telephoto frame, and use autofocus before fine-tuning the focus manually if necessary. Keep the gain low and adjust the shutter speed until the solar disk retains visible detail without clipped highlights.
For the image below, the visible and defined sunspots indicated that the exposure was under control. I used a shutter speed of 1/200 second with the gain set to 0. Treat that as a starting point rather than a universal setting, as the correct exposure will depend on the filter, atmospheric conditions, and the sun's position.
DWARF Mini Key Technical Specifications
- Weight: 840 g
- Telephoto sensor: Sony IMX662, 1/2.8-inch type, with 2.9 µm pixels
- Wide camera sensor: OmniVision OS02K10, 1/2.8-inch type
- Resolution: 2 MP raw capture
- Telephoto lens: 30mm aperture, f/5, and 150mm focal length
- Wide lens: 3.4mm aperture and 6.7mm focal length
- Telephoto field of view: approximately 2.4 by 1.2 degrees
- Movement: 360-degree horizontal pan
- Built-in filters: dark-frame, astro, and dual-narrowband filters
- Solar filter: front-mounted magnetic filter
- Internal storage: 64 GB
- Battery life: up to four hours
- Connectivity: Wi-Fi, NFC, and app control
- Price: around $399
Shooting With the Camera You Already Own
You do not need to buy a dedicated eclipse rig to come away with strong images. If you have a DSLR or mirrorless camera with a telephoto lens, that is your starting point, and the same rules apply whether it is a 100-400mm zoom or a 600mm prime: the longer the reach, the bigger the sun will appear in your frame.
Anything under 300mm will render the sun as a fairly small disk, so if you are working with a shorter focal length, lean into wider compositions instead, such as a foreground landscape, a silhouetted crowd wearing eclipse glasses, or the changing quality of light across a scene. These are all valid ways to tell the story without needing to fill the frame with the sun itself.
Whatever body and lens you are using, the solar filter is nonnegotiable whenever any part of the sun's bright surface remains visible. A dedicated solar filter securely fitted over the front of the lens is the safest option. Do not look through a camera's optical viewfinder at the sun unless the lens has been correctly filtered.
Shoot in raw so you have the latitude to recover highlight and shadow detail afterward, switch to manual exposure, and bracket generously during totality. The corona spans a broad range of brightness, so a single "correct" exposure does not really exist. Use manual focus, locked on the sun's edge or a sunspot before totality begins. A sturdy tripod and a remote shutter or timer-delayed shutter will help keep things sharp.
Only observers inside the path of totality may remove the solar filter, and only after the sun's bright face has been completely covered. Replace the filter before the first bright point of sunlight reappears at the end of totality. Anyone outside the path of totality must keep the filter fitted throughout the entire eclipse.
For a broader introduction to shooting night skies and processing astrophotography, see Photographing the World 2: Cityscape, Astrophotography, and Advanced Post-Processing.
Other Skywatching Events in August
If you are not in an area where the solar eclipse will be visible, you still have other options this month. The Perseid meteor shower reaches its annual peak around August 12–13, although moonlight will affect visibility this year. Venus will also be prominent in the evening sky during August. A partial lunar eclipse will occur August 27–28, although its visibility will depend on your location. Finally, NASA and SpaceX are targeting August 30 for the launch of the Nancy Grace Roman Space Telescope aboard a Falcon Heavy. It is a busy month for stargazers and a good reason to spend more time looking up.
What's Your Reaction?
 Like
0
Like
0
 Dislike
0
Dislike
0
 Love
0
Love
0
 Funny
0
Funny
0
 Wow
0
Wow
0
 Sad
0
Sad
0
 Angry
0
Angry
0





Comments (0)