

Photoshop's Light Layer Looks Like Lightroom. It Doesn't Act Like It.
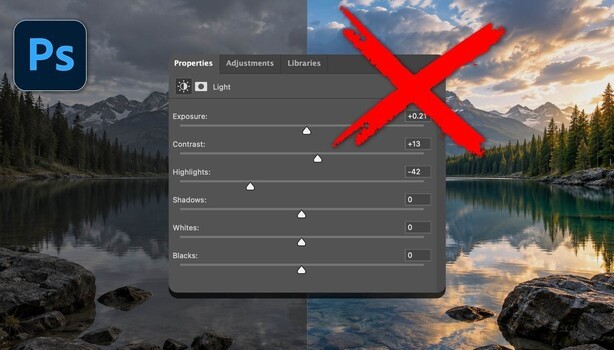
Adobe quietly slipped a Light adjustment layer into the main Photoshop interface, and it looks almost identical to the tone and exposure controls you already know from Lightroom and Camera Raw. That resemblance is the whole problem, because now people can't tell where they should actually be making these edits.
The confusion is common enough that Matt Kloskowski built an entire video around it, walking through side-by-side comparisons that show exactly what happens when you push the same adjustment in each program. His rule is simple: anything touching tone, light, contrast, or color belongs on the raw photo, whether the change is global or selective. The raw editors also hand you better masking and selection tools than Photoshop's interface, which wasn't always true but is true now. Sharpening, noise reduction, optics, and lens corrections all fall into the same bucket. There are fewer reasons than ever to leave the raw file.
The demonstrations are where Kloskowski makes the case stick. He pulls the highlights down on a bright cloud bank in both the Light layer and Lightroom, then zooms in on the same patch of detail. In Photoshop, the highlights go muddy and the detail smears together into gray. In the raw editor, the color and structure survive. He repeats the test on a shadow-heavy image, cranking the shadows up to an extreme he'd never actually use, and the Light layer produces blocky, pixelated black with the detail gone for good. Lightroom gets noisy in the same spot, but you can still read every branch of the tree.
None of this is a blanket ban on the tool. Kloskowski is careful to point out where the Light layer earns its place, and he's honest that he uses adjustment layers himself when the project calls for them. On a photo with limited dynamic range, he says you could add a Light layer, nudge contrast and exposure, and never see a difference in the final result. The trouble starts when the exposure needs real work. He also raises a practical cost that has nothing to do with image quality: save that Photoshop file with a single adjustment layer and it can balloon to nearly 400 MB, while the original raw file sits under 50 MB. Good storage still isn't cheap.
Understanding why the Light layer exists at all makes the whole decision easier. Photoshop was never built only for people shooting raw files. Graphic designers, web designers, and layout artists make up a huge share of its users, and most of them never open Lightroom or Camera Raw. Adobe gave those users adjustment layers with familiar names so they could edit tone and color inside collages, composites, and ad layouts where there's no raw file underneath at all. Seen that way, the Light layer isn't a competitor to your raw workflow. It's a tool for a different job that happens to look like yours, which is why it shines on layered composites and struggles on a heavy exposure fix. Once you know who it was made for, you know when to reach for it. Kloskowski shows this directly with a composite where he clips a Light layer to a subject so he can judge the brightness against the rest of the scene, something you simply can't do from a raw editor.
Watch the video above to see the zoomed-in comparisons for yourself and catch every case where Kloskowski says the Light layer actually belongs in your edit.
What's Your Reaction?
 Like
0
Like
0
 Dislike
0
Dislike
0
 Love
0
Love
0
 Funny
0
Funny
0
 Wow
0
Wow
0
 Sad
0
Sad
0
 Angry
0
Angry
0









Comments (0)