

Why Time Blending Beats a Single Long Exposure
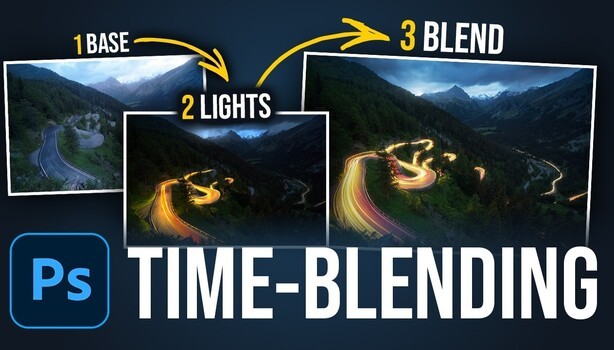
Light trails on a road can turn a flat night shot into something with real energy, but capturing them all in one clean frame is harder than it looks. Time blending lets you combine several exposures so the streaks flow together the way a single long exposure rarely manages.
The technique comes from a Photoshop walkthrough by Christian Möhrle, who starts by dragging a full set of raw files straight into Photoshop to open them in Camera Raw. He picks the brightest frame as his base image and switches the profile from Adobe Color to Adobe Neutral, which makes recovering the exposure easier. From there he pushes the exposure up, lifts the blacks and shadows to hold detail without clipping, and warms up a white balance that came in too cold. Möhrle keeps the foreground deliberately dark so the red and orange light trails on the road stand out against it.
Once the base image is graded, the real work begins. Möhrle synchronizes his settings across every frame in the series, then opens all of them as objects so each one sits as a separate file in Photoshop. He copies each light-trail frame onto the base layer, stacks them, and blends them using the lighten blending mode, which he prefers for its natural look. The sky is the catch he plans for: because every frame carries its own sky, blending them all together creates a mess up top, so he masks the sky out of each light-trail layer with a black brush. He also paints out any trail that stops abruptly on the road, chasing a single continuous streak instead of a series of broken ones.
Time blending sits in the same family as focus stacking and exposure blending, and the principle carries across all three. You are building one final image from several frames that each hold the best version of one thing, whether that is sharpness, dynamic range, or, here, a clean stretch of light. The skill that ties them together is masking, and the workflow Möhrle uses on the sky and the road applies just as well to blending two exposures of a sunset or merging bracketed shots of an interior. Learn to paint a mask precisely and you can decide exactly which pixels from which frame survive into the final file. That control is what separates a stack that looks intentional from one that looks like a mistake.
The color work is worth paying attention to on its own. Möhrle pushes the red and orange saturation to make the brake lights and headlights read as intense as possible, lifts the greens to bring life back into the landscape, and skips split toning entirely because the image does not need it. He also nudges the blue primary in the calibration panel, a small adjustment that shifts the whole color character of the frame. His sharpening pass uses the masking slider with the alt key held down, a habit that limits the sharpening to edges and keeps smooth areas like the sky clean.
Watch the video above to see how Möhrle masks each layer and merges the final stack into one finished frame.
What's Your Reaction?
 Like
0
Like
0
 Dislike
0
Dislike
0
 Love
0
Love
0
 Funny
0
Funny
0
 Wow
0
Wow
0
 Sad
0
Sad
0
 Angry
0
Angry
0







Comments (0)