

Traveling With the VIVO X500 Pro Max Photographer’s Kit: Is It Ready to Replace a Full Camera Setup?
As smartphones continue to pack increasingly advanced optical and digital technologies, the line between a phone and a dedicated camera grows blurrier by the day. It begs the question: is carrying a separate camera setup still necessary, or can a single pocketable device take over your entire imaging workflow? Honestly, the idea of having a single device covering an extraordinary equivalent range of 15mm to 400mm is undeniably tempting. To put vivo’s bold claims of turning casual motion into professional cinema to the test, I took the vivo X500 Pro Max Photographer’s Kit on a recent trip to Vietnam to see how smoothly it could slot into a professional photographer's real-world casual documentation workflow.
Build Quality and Ergonomics
Before adding any external gear, the vivo X500 Pro Max on its own looks quite refined—modern, clean, and elegant. The phone features a flat, somewhat boxy design with squared-off edges. Despite being a phone heavily catered to photography, there is no dedicated physical shutter button on the phone body itself. Instead, you get the standard volume button and power button on the right side, paired with a shortcut button on the left that is fortunately customizable to launch the camera app. What is slightly unfortunate, however, is that this left-side function button is prone to accidental presses when setting the phone down sideways with the grip attached.
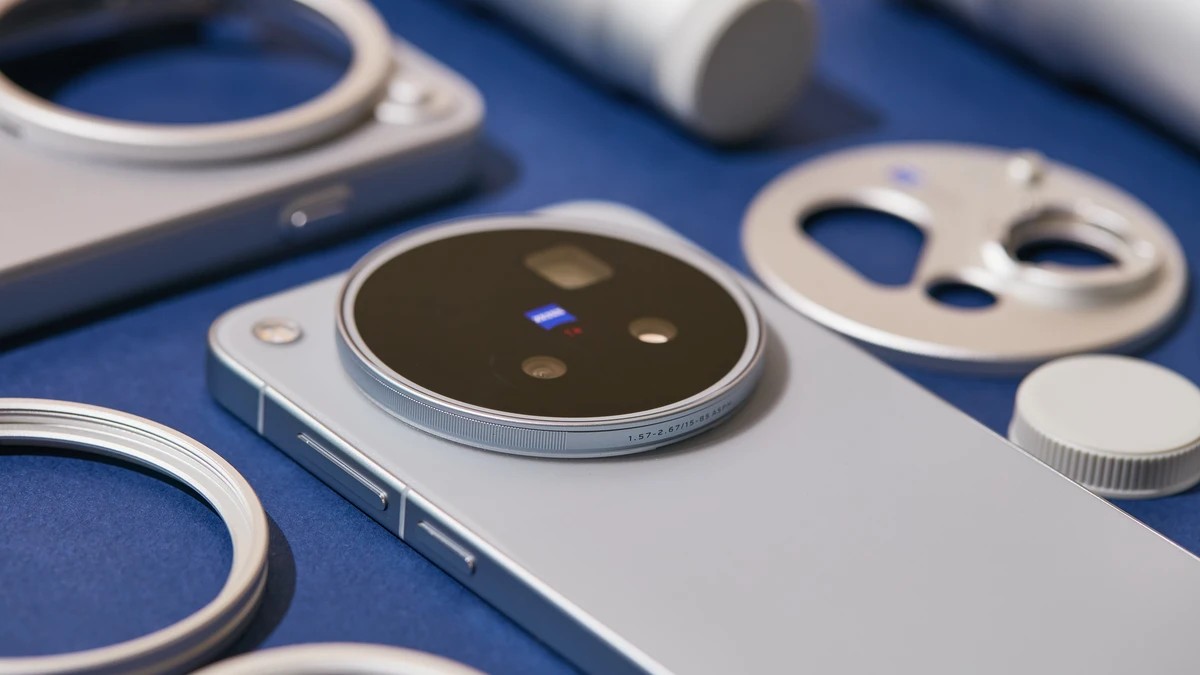
Flipping to the back, you are greeted by a large, centered "metallic biscuit-style" camera module. Thanks to its symmetrical design, it not only looks sleek but also minimizes annoying table wobble when typing or tapping while the phone is laid flat on a desk. At first glance, the camera housing features four identical circular cutouts, but there are actually only three active camera lenses inside—the fourth cutout is purely for the ZEISS APO branding label. All three lenses are also coated with ZEISS's renowned T* anti-reflective coating.
The front display is shielded by Armor Glass, protecting a 6.85-inch 2K ZEISS Master Color Display, while the back cover comes in either AG Glass (Sunny White, Sunset Orange, Starry Gray) or Glass Fiber (Moonlit Black) via vivo's Color, Material, and Finish (CMF) process. The unit I tested is the Starry Gray version, which features a beautiful dual-tone back studded with fine glitter dots that sparkle like stars as it catches the light. Despite its substantial footprint (163.32 mm × 76.82 mm × 8.12 mm) and massive 7,800 mAh battery, the body feels exceptionally premium and remains remarkably lightweight in hand, weighing just 225 g or 229 g depending on the back material finish.
Durability is top-tier, as expected from a bar-shaped flagship, featuring dual IP68 and IP69 dust and water resistance ratings. Interestingly, despite having weather sealing on my professional full frame cameras, I actually feel more comfortable shooting in dusty environments or sudden tropical downpours with a smartphone—likely because there are no external moving parts and everything is sealed inside a solid glass-and-metal slab. To further enhance durability, the outer camera glass is protected by an Organic Nano Polymer and an Ultra-Hard AR Coating, which includes a 13-layer scratch-resistant coating designed to reduce reflections and increase glass hardness.
If you opt for the Photographer’s Kit package, it arrives in a nicely designed box containing a specialized protective case with interchangeable adapter ring plates (supporting both a 62 mm filter thread, telephoto lens mounts, and the standard protective ring), an Imaging Grip with physical camera controls, a vivo × PGYTech co-designed neck strap (reminiscent of high-end Apple Crossbody straps), Tripod Collar Rings for each telephoto extender, 200mm equivalent (Gen 2) and 400mm equivalent (Gen 2 Ultra) ZEISS Telephoto Extenders, and an extra set of protective front and rear lens caps.
Attaching the Imaging Grip from the Photographer’s Kit completely transforms your physical interaction with the device. The grip gives your right hand a natural palm swell, a control wheel, a function button, a dedicated video record button, and a physical shutter release. This elevates the overall experience from a standard smartphone tap-to-shoot interface into a far more tactile, camera-like workflow. Beyond ergonomics, the grip also doubles as a convenient kickstand to prop the phone upright vertically or horizontally. It houses a 2,300 mAh internal battery, primarily to power its controls and top up the phone's power on the move, though it is barely sufficient to even supply half of the phone's massive internal capacity. Crucially, with the grip attached, the USB-C charging port is relocated to the bottom edge, making it much easier to keep the rig powered while mounted on a tripod. Keep in mind that once the Imaging Grip is locked in place via USB-C, you cannot remove the phone case without detaching the grip first.
For everyday documentary shooting where I don't need to mount filters, I choose to leave the lens attachment plate and imaging grip permanently on the case. It adds minimal bulk and allows me to mount the telephoto extenders effortlessly whenever extra reach is required. What I appreciate most about this setup is that the entire kit occupies a fraction of the physical space of a traditional mirrorless system—making it ideal as a lightweight travel setup or when shooting in tight spaces. Handling the entire rig single-handedly is remarkably easy. The full telephoto setup is no longer strictly pocketable because that was never the goal when dealing with an optical range that stretches up to 400mm. Carrying the accessories in a small sling bag and treating the vivo X500 Pro Max as a dedicated camera makes complete sense. Here, I wished vivo had supplied the Photographer’s Kit in a dedicated waist bag or travel pouch instead of a large presentation box, so creators would have an everyday carry solution right out of the box.
Mounting the larger telephoto extenders shifts the phone's center of gravity significantly to the left side. While resting your left hand under the lens barrel adds great stability when shooting handheld, it creates an awkward off-center visual experience when mounted directly on a tripod head using the grip’s ¼-inch thread. Using the included lens support collar doesn't help much either, as it simply shifts the mounting point further left. To be honest, I don't think the lens support is strictly necessary, as the telephoto extenders (weighing 153 g and 248 g respectively) aren't actually that heavy to strain the bayonet mount. In practice, it’s an accessory I’ll likely leave in the box, as I prefer using my own smartphone clamp that grips the physical center of the phone. There is also a slight amount of physical play on the bayonet mount when locking the telephoto extenders into place. Lastly, the 62 mm filter adapter ring may require stepping rings for existing filter collections; including a native 62 mm ND filter directly in the kit would have been a massive win for video creators.
Camera Features
If it's not obvious, the key focus of the vivo X500 Pro Max is its comprehensive imaging array co-engineered with ZEISS, anchored by three distinct rear focal lengths and a strong front camera setup. The primary shooter at a 24mm equivalent focal length houses a 50 MP Sony LYTIA L910 LOFIC sensor with a large 1/1.28" footprint, paired with a bright f/1.57 aperture lens. It also features Laser Autofocus, rapid 60 fps AF Tracking, and an advanced 3° Gimbal-Grade OIS system to keep handheld video footage silky smooth. Complementing the main lens is a 50 MP 15mm Ultra Wide Angle camera utilizing a 1/2.75" JN5 sensor with an f/2.0 aperture and full autofocus support. On the front, vivo incorporated the 50 MP 1/2.76" JN1 sensor with a 20mm equivalent wide angle selfie camera and an f/2.0 aperture, delivering a 92° field of view and autofocus for clean self-portraits and vlog-style capture.
The undisputed highlight of the rear imaging system is the 200 MP ZEISS APO Telephoto camera. Built around a massive 1/1.4" Ultra-Sensing sensor with an f/2.67 aperture and an 85mm equivalent focal length, it carries the ZEISS APO tag, so we can expect this lens to perform well in reducing chromatic aberration while preserving accurate color and contrast even at high zoom levels. It also integrates an impressive CIPA 7.0 optical image stabilization and continuous 60 fps AF Tracking, ensuring steady handheld framing when targeting distant or fast-moving subjects. The optical system fully supports the modular vivo ZEISS Telephoto Extender System (Gen 2 and Gen 2 Ultra), allowing creators to push their native reach optically.
For motion picture and video production, the X500 Pro Max introduces cinema-grade recording specifications backed by specialized tracking engines. The main sensor features a dedicated Log curve that unlocks up to 17 EV dynamic range from the LOFIC sensor and 10-bit color, preserving fine shadow details and preventing highlight clipping in extreme high-contrast lighting like sunsets or backlit scenes. Depending on the lens module, video creators can record up to 8K at 30 fps and 4K at 240 fps video, alongside 4K Cinematic Portrait, 4K Cinematic Color, and multi-camera 4K Dual-View modes. Underneath the interface, vivo’s X-Track and Super Snapshot engines drive intelligent subject tracking—including 30x Long-Range Motion Snapshot and Super Stage AF Tracking Video—keeping subjects locked in crisp focus across dynamic travel and live-action scenarios.
Other Technical Specifications
Basic and Hardware Specifications
- Operating System: OriginOS 7
- Processor (SoC): MediaTek Dimensity 9600 Pro (TSMC N2P 2 nm manufacturing process)
- RAM / Storage Configurations: 12 GB RAM + 256 GB ROM/ 512 GB ROM/ 1 TB ROM
- Battery: 7,800 mAh BlueVolt Battery (TYP)
- Charging: 90 W Wired FlashCharge and 40 W Wireless FlashCharge
Display and Visuals
- Screen: 6.85-inch 2K ZEISS Master Color Display (1440 × 3168 resolution, 507 PPI).
- Refresh Rate: 1 Hz – 144 Hz adaptive LTPO.
- Brightness: 4,400 nits Peak Brightness (@ 20% APL).
- HDR Support: Dolby Vision & Ultra HDR.
- Eye Comfort: SGS Low Blue Light Certification.
Audio and Biometrics
- Fingerprint Sensor: 3D Ultrasonic Fingerprint Scanning (In-display)
- Speakers: Master-Level Dual Stereo Speakers
- Microphones: Quad-Mic Audio Recording Master
Connectivity and Interfaces
- Wi-Fi: Wi-Fi 7 (2.4 GHz / 5 GHz / 6 GHz)
- Bluetooth: Version 6.0
- USB Interface: USB 3.2
- NFC: Supported
Software and Ecosystem
- System Engine: Origin Smooth Engine, Snap-Up Engine, Fluid Motion, Origin Workbench
- Interoperability: Apple-friendly cross-ecosystem connectivity, vivo Office Kit, Quick Share, Shake & Share
- AI Productivity: Jovi AI Agent, AI Recorder, AI Note, AI Creative Camera, Movie Workshop
Real-World User Experience
In day-to-day usage across my trip to Vietnam, the vivo X500 Pro Max proved to be a reliable companion for casual travel documentation, shooting alongside my Leica SL2-S. Playing each camera to its strengths, the Leica was my go-to for dedicated prime-lens photography, while the vivo was what I pulled out for quick shots where I needed a longer focal length without swapping glass. Its relatively compact size makes it easy to slip into a small sling bag.
Generally, despite not having an optical or electronic viewfinder, the massive 6.85-inch display with a local peak brightness of up to 4,400 nits feels remarkably easy to frame with. Composing shots outdoors is smooth and straightforward. However, accurately evaluating exposure under strong backlit conditions remains challenging due to environmental glare overpowering the screen. In these situations, further increasing the display brightness doesn't help—what you really need is a physical shade to block the sun.
Inevitably, pushing this much computational processing power in a warm tropical climate causes the phone to warm up slightly in hand after long hours of continuous shooting. However, compared to other smartphones I have used previously, I would say that the thermal management is remarkably well-engineered. Power management is equally impressive. I easily pulled through full shooting days with some battery to spare by the end of the day. Having the massive 7,800 mAh internal battery definitely did help here.
When it comes to still photography, the camera system seems to automatically balance instant responsiveness with heavy computational processing by shifting complex tasks to the background. While shooting in the field, I noticed that the live viewfinder preview occasionally drops to a lower resolution—presumably to conserve processing power and maintain snappy shutter response. Once a photo is captured, instantly clicking into image playback reveals a briefly blurred preview with the ZEISS logo for a fraction of a second before the fully rendered file appears.
While the sensor array can output massive 50 MP and 200 MP files, shooting at full resolution creates a noticeable buffer delay that slows down shot-to-shot cadence. While these ultra-high-resolution modes do resolve more detail, they can also occasionally introduce digital processing artifacts like over-sharpening and heavy noise reduction. If you are willing to accept those trade-offs, the resolution is there; however, for casual documentation, I recommend sticking to the standard 13 MP or 25 MP output modes. They offer far snappier response, smaller file footprints, and practically identical visual detail for general viewing.
That said, for critical applications where image quality is paramount, I prefer shooting in raw. Shooting in raw allows us to grade the files ourselves, bypassing aggressive default JPEG sharpening and noise reduction algorithms to extract significantly cleaner, more natural results from the sensors. Do note, though, that raw and SuperRAW are only available at 13 MP. Should you need higher resolution, you can choose to upscale in post or shoot in JPEG format.
Original Raw and Original JPEG
Edited Raw and Original JPEG
Catering directly to photographers, the camera interface allows users to set a 1.5x default starting focal length on the main sensor, jumping straight to a classic 35mm-ish equivalent focal length used for street photography. If you prefer 24mm as your default baseline, tapping the 1x button on screen smoothly toggles between 24mm and 36mm. There is also a 2x mode (48mm equivalent) achieved via digital interpolation, splitting the difference between the 24mm main lens and the 85mm telephoto module. Interestingly, this middle focal step shifts to 50mm equivalent when switching to Pro Video mode.
Color science remains remarkably uniform across all focal lengths—including the front-facing camera—with the ZEISS Natural Color profile delivering rich and pleasing tones. The only minor weak link in color and noise consistency is the ultra-wide lens, which renders slightly duller color even under bright sunlight. I also find the tones tend to lean toward the cooler side in most situations. For those interested in the engineering philosophy behind this rendering, ZEISS shared a deep dive into their mobile color science collaboration:
Personally, I think the X500 Pro Max truly shines when approached with intention as a dedicated filming device. It offers multiple microphone configurations for flexible audio capture, delivers multiple focal lengths within a single body, and outputs clean video from both the primary rear array and the 50 MP front camera. In Pro Video mode, you gain access to serious production tools like focus peaking, custom gridlines, false color, and a live waveform display for precise exposure monitoring. I strongly recommend recording in the Log profile solely because the included Rec.709 conversion LUT converts color beautifully in post-production. Keep in mind, however, that selecting Log locks the minimum base ISO to 800. However, even if you don’t shoot in Log, I don’t think you are losing out much since you will gain automatic exposure blend for better highlight and shadow balance. Though footage may look more artificial in this mode.
Creators must also be aware of exposure jumps when filming with manual settings, as all three rear lenses feature different fixed physical apertures: the main sits at f/1.57, the ultra-wide at f/2.0, and the telephoto at f/2.67. I wish vivo had added a physical variable aperture to the main sensor to stop down manually; this would allow creators to keep exposure seamless across lens switches without needing to adjust a variable ND filter.
Speaking of neutral density filters, mounting a 62 mm ND filter produced no visible vignetting across the frame, even on the ultra-wide lens. However, as with any variable ND, watch out for double-polarization artifacts, which can unevenly darken parts of the frame if rotated too far. Having no physical variable aperture also means you cannot produce natural optical starburst effects around light sources in photos or videos.
Pro Video mode seems to rely on true optical exposure and shutter speed settings rather than computational exposure blending, which is immediately apparent in how naturally bright highlights and light roll-offs are rendered. Pro tip: If keeping the 180-degree shutter angle is not important for you, go ahead and shoot Log profile in normal video mode, as this will help you take advantage of vivo’s claimed 17 EV dynamic range through computational exposure blending, while avoiding the artificial look you get from normal Rec709 video.
If you are strict about broadcast or delivery standards, note that recorded frame rates still exhibit minor decimal variations rather than absolute integer values (for instance, a 30 fps setting may log as a 30.536 fps file). While this won't impact general NLE editing workflows, it is something to be aware of if uploading directly to platforms with strict ingestion specifications.
A few operational quirks are worth noting when filming: switching from photo to video mode introduces a slight sensor crop. This cropping effect is exaggerated on the telephoto end; when framing a tight subject with the telephoto extenders attached, the crop can push your framing into an awkward middle ground where it becomes unclear whether the extender is helping or hurting composition. Additionally, certain cinematic film styles lock recording strictly to 24 fps, and the stock camera app does not support open-gate video recording. While third-party apps like Blackmagic Camera unlock open-gate capture, they lack native integration with the Imaging Grip and telephoto extenders (resulting in inverted preview images when extenders are mounted).
Finally, the multi-zone laser autofocus sensor algorithm tends to prioritize subjects closest to the lens. This can become frustrating when shooting through a window, as the focus routinely locks onto dust or scratches on the glass. While switching to manual focus solves this, it introduces its own set of UI trade-offs: the manual focus slider relies on an arbitrary 0-to-1 digital index rather than physical distance markings, the focus scroll wheel takes up roughly 15% of the preview window, and pressing the physical shutter button on the grip unexpectedly resets manual focus back to auto (forcing you to use the on-screen shutter button instead). Furthermore, there is no way to access manual focus in standard video mode unless you switch into Pro Video. That said, subject tracking remains reliable when activated by double-tapping a subject directly on screen.
The Photographer’s Kit and Telephoto Extenders in the Field
With so many resources poured into developing this photography kit system, it is only fair that I dedicate a small section to talking about this. There is no doubt attaching the Imaging Grip instantly changes your physical handling of the device. The physical shutter release and tactile zoom controls improve overall stability and allow for effortless single-handed shooting—even with a telephoto extender attached. I also appreciate being able to rest my right thumb securely on the top corner of the screen without accidentally triggering on-screen buttons. To streamline operation, I configured the grip to auto-wake the phone and launch the camera app upon double-tapping the shutter button.
However, a few design details could be refined. For one, connecting an external USB-C microphone receiver requires removing the grip entirely, as the USB-C port on the grip itself does not support data passthrough. While shutter response is generally good, focus acquisition can sometimes feel slightly delayed because pressing the physical shutter button forces the camera to re-acquire focus before firing (unless set to AF-C mode). The customizability of the Function button is also somewhat limited; I would love to remap it to quickly toggle between auto and manual focus. Additionally, I wish the zoom toggle offered a quick-flick gesture to jump instantly between native prime focal lengths while smoothly zooming when held down. Finally, the grip itself lacks an IP weather rating, so extra care is required when shooting in heavy rain or dusty environments.
The Gen 2 (200mm equivalent) and Gen 2 Ultra (400mm equivalent) ZEISS Telephoto Extenders completely transform long-range capture, eliminating the smudgy, over-processed look of standard digital zoom by providing true optical reach. Stabilization with the extenders attached is fantastic, supported by a helpful mini-preview window to guide long-range framing. Distortion and chromatic aberration control are exceptionally well-handled, with the latter appearing to be digitally corrected by the image pipeline instead of optical correction.
Though not explicitly advertised, light transmission (T-stop) will inevitably drop with the addition of extra optical glass elements, so caution is needed when shooting in low-light environments. Rolling shutter artifacts also become more pronounced above 200mm, becoming particularly noticeable when tracking fast-moving subjects or in my case, shooting out of an airplane window.
Here is the hard bullet to bite. Personally, I don’t think normal everyday users are going to need these telephoto extenders, as they turn the phone into a highly specialized tool for niche applications like birding, live concerts, or distant landscape photography. This is because the X500 Pro Max camera array is already more than capable and straightforward on its own. With the telephoto extenders, you will have to be a little bit more deliberate: You must manually enable "Lens Extender" mode in the camera settings to un-invert the preview image, you cannot instantly switch back to wide angle shooting without physically unscrewing the attachment, and the filter adapter ring cannot be mounted concurrently with the extenders. Furthermore, minimum focus distance also increases to roughly 1 meter with the extenders attached.
This is why, if possible, I still firmly believe native telephoto zoom directly on the phone remains the ideal solution. Or if it's not too greedy to ask, an optically zoomable lens attachment will be great, eliminating the need to carry two separate prime extenders. With the current hardware, the 200mm extender represents the ideal sweet spot for travel: pairing the 200mm lens with a light digital crop reaches 400mm effectively without the added bulk and weight of the larger attachment. Ultimately, while the telephoto add-ons require intentional setup, the base phone remains an effortless tool for spontaneous daily documentation. When you slow down and mount the kit with purpose, the vivo X500 Pro Max turns into a surprisingly powerful and capable filmmaking rig.
Sample Gallery
Summary
What I Liked
- Massive optical reach in a portable package: Having a comprehensive 15mm to 400mm focal range tucked into a compact setup makes it an incredibly versatile travel companion.
- Transformative imaging grip: Having physical controls streamlines zooming, focusing, and shutter release while adding palm stability and a built-in battery boost. The added bonus of moving the USB-C charging port underneath makes shooting on a tripod much more seamless.
- Telephoto extender lenses (200mm and 400mm): Deliver clean optical reach in a remarkably compact physical footprint.
- Pro video capabilities: Professional-grade tools including 17 EV Log profile recording, APV encoding, and native waveform preview support make it a powerful filming device.
- Color consistency across all lenses: Color science remains remarkably uniform across the camera system; albeit slightly weaker on the ultrawide and front-facing cameras, the ZEISS Natural Color profile still delivers very pleasing tones.
- Exceptional image stabilization: Advanced OIS keeps framing rock-solid for both high-magnification telephoto shots and handheld video capture.
- Outstanding battery life: The massive internal battery and supplementary power from the grip are capable of supporting heavy shooting sessions.
What Could Be Improved
- Improving the Imaging Grip controls & build: Upgrading the USB-C port for data passthrough on the grip to support accessories like external mic receivers, full weather-sealing for harsh conditions, and a software update for a more intuitive zoom toggle—where a quick flick jumps directly between fixed lens focal lengths, while holding the toggle smoothly zooms through the range.
- Variable aperture on the main lens: Adding a physical variable aperture to the main camera module would allow creators to manually stop down and match exposure settings seamlessly when switching between the main and telephoto lenses during video recording.
- Better native optical reach: Greater native optical zoom directly on the phone (without needing external add-ons) would elevate its usability performance.
- Smart bayonet contact pins: Electronic contacts on the telephoto extenders would allow the phone to automatically detect when a lens attachment is mounted.
- All-in-One optical zoom attachment: An optical zoom extender attachment would be far more convenient than carrying two separate prime extenders (200mm and 400mm).
- Filter compatibility: There is currently no way to use the 62 mm filter adapter simultaneously with the telephoto extenders.
- Computational processing artifacts: While impressive, the imaging pipeline can still produce images that exhibit aggressive noise reduction or over-sharpening artifacts upon close inspection.
- Missing video features: Inclusion of open-gate video recording would give creators far more framing flexibility for multi-platform delivery.
- Travel carrying case & filter bundling: A 62 mm filter and a dedicated, well-organized transport case or pouch for all the kit accessories would be great.
Final Thoughts
There are an enormous number of things to like about the vivo X500 Pro Max and its Photographer’s Kit. If you made it this far, you would notice I approached this review with the intention of treating it as a dedicated imaging tool instead of a smartphone. The more I use it, the more it truly begins to feel like a real camera. Midway through my trip, I caught myself feeling genuinely excited operating it as a camera—before occasionally remembering that, beneath the grip and external glass, it is still a smartphone. While it still cannot fully match the raw image quality, dynamic range depth, and sensor physics of a dedicated full frame system, having an extraordinary focal range of 15mm all the way to 400mm packed into a portable setup leaves very little room for complaint.
To be completely honest, after having access to this device for weeks, I can’t help but feel that vivo might be putting a bit too much effort and resources into the telephoto extension system for what is ultimately a niche set of applications like birding, long-range landscapes, or distant stage events. Yet, despite those modular quirks, I consistently found myself reaching for this setup over traditional gear simply because of the sheer focal flexibility it offers without the heavy bulk or constant lens swapping. For travel and projects where space efficiency is crucial, this is easily one of the best integrated packages you can get.
Lastly, coming from the perspective of someone who relies on professional camera gear on a daily basis, if you are willing to accept the slight computational image quality compromises for convenience, this device delivers a remarkably complete package—giving you a versatile multi-lens rig that also happens to be your everyday smartphone if you need it to be. If this setup were all I had on me to make photographs and capture video, I certainly wouldn't complain. With a heavy heart, I have to admit, with every generation of computational photography, the line between smartphone and standalone camera is drawing remarkably close.
What's Your Reaction?
 Like
0
 Dislike
0
 Love
0
 Funny
0
 Wow
0
 Sad
0
 Angry
0







Comments (0)