

Lightroom's Intersect Mask Tool Can Solve Edits You've Been Doing the Hard Way
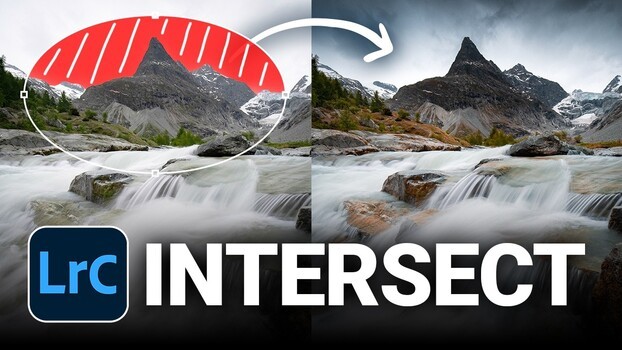
Lightroom's masking tools are powerful, but there are times when a sky mask or landscape mask alone won't isolate exactly what you need. The intersect tool lets you combine two masks so only their overlapping area is targeted, giving you precise control that add and subtract alone can't match.
Coming to you from Christian Möhrle - The Phlog Photography, this detailed walkthrough shows exactly how to put Lightroom's intersect tool to practical use on a mountain landscape. Möhrle starts by creating a Lightroom sky mask, then intersects it with a linear gradient to darken only the upper portion of the sky without touching the mountain beneath it. He then adds a second intersected mask using a radial gradient placed behind the mountain peak to simulate a natural light source, bringing up exposure and whites just enough to make it convincing. The key detail here is that the radial gradient alone would bleed into the mountain, but intersecting it with the sky mask keeps the effect exactly where it belongs.
From there, Möhrle tackles the foreground water. A plain radial gradient over the cascades picks up surrounding rocks, which he doesn't want. Instead, he builds a landscape mask targeting only water, then intersects it with a radial gradient to isolate the cascades specifically. He bumps texture, clarity, whites, and saturation to make those small water features pop without affecting the rock detail around them. It's a clean solution to a problem that would otherwise require tedious brush work.
The dodging and burning section is where the technique gets especially useful. Rather than painting blindly with a brush, Möhrle sets his tonal adjustments first using a linear gradient that covers the entire image, so he can see the effect before committing to any area. He then intersects that gradient with a soft, low-flow brush and paints only the regions he wants to lighten or darken. For burning, he specifically targets areas that are already in shadow, keeping the result from looking unnatural. This approach lets you dial in the look of an adjustment before deciding where it lands, which changes how you think about dodging and burning entirely. The video also covers color work in the HSL panel, split toning for a cooler midtone cast, calibration adjustments using the blue primary hue, and final sharpening settings in the detail panel. Check out the video above for the full rundown from Möhrle.
What's Your Reaction?
 Like
0
Like
0
 Dislike
0
Dislike
0
 Love
0
Love
0
 Funny
0
Funny
0
 Wow
0
Wow
0
 Sad
0
Sad
0
 Angry
0
Angry
0








Comments (0)